 |
 |
|
Site Index
|
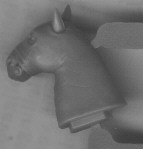
Converting Imperial Horses Imperial Horse Heads One of the main differences between fantasy and historical miniatures is the size of the mounts. Historical manufacturers seem to consider horses as a waste of lead, since they make them much smaller (see the Horse Miniature Comparison page for more on this subject). Being used to the bigger, fantasy counterparts, the current GW size seems about right to me. A major drawback is the fact that they don't have many options in their armoured horses. They still use the same two plastic variants they've been producing for years, with the sole addition of a third head variant with the new knightly order sprue. Closer examination of the new GW imperial plastics gave me the idea of creating a few head variants myself. Some are fairly simple conversions using a knife, some plastic bits and a drop of glue. Others are more complicated and will require a fair amount of greenstuff. The most basic conversion is to start from a standard armoured horse head and a plastic standard top.The knightly order sprue comes with 3 different standard tops: a skull, a panther and a wolf. Two easy steps: first, remove the spike on the horse's head that makes it look like a unicorn. Then replace it with the standard top. Voila, instant first knight or grandmaster horse head. It may sound simple, but it looks really good if you reposition the horse to rear up on it's hind legs. Easy and effective. The same can be achieved using the crests from spare imperial or bretonnian knights heads for more variety, or even other items like human skulls or whatever suitable bits you have left over from other projects.
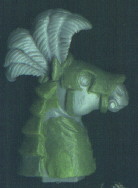
Now for something a bit more complicated, if you feel up to it. The next conversion will require some greenstuff, a spare plastic knight head and a plastic horsehead. The same techniques can be applied to a metal horsemodel you have lying around if you want. If you stick with the plastics, there are a few possible options. You can start from a basic armoured horse head like before, or from a barded (empire or bretonnian) or bare head, in which case you'll have to sculpt the pieces of armour as well. In this example I chose to go with the old imperial barded horse head. The advantage of this older head lies in the fact that it's just slightly slimmer than the other ones, thus giving more opportunity to add layers without it getting too big. But that doesn't mean you can't use the other heads with equal or better results.
I
recommend that you remove the original ears with a knife (watch out for
your fingers). They're not that well made and they'll only get in the
way (the ears, not your fingers) (I think). Next will be to look
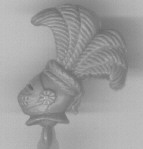
for a suitable knight crest to add to your horse's head. When you've selected
an appropriate one, cut that off too (maybe I'll tell you what I did with
the rest of it some other time). You can now glue it to the head (or wait
till a later point). Don't worry if it's not a seemless fit, as we'll
cover that up later on. You can skip to that part now if you used an armoured
head to begin with.
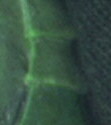
If you used one of the clothbarded or unbarded heads, now is the time to start sculpting some armour. We don't want to make this too hard as it's our first one, so we'll stay close to the standard issue. If you're new at this, I'd recommend you work on one part at the time and let it cure. It's very easy to accidentally put you're finger on some freshly sculpted detail while you're working on the other end of the model. For the frontal plate, there's not much to describe. Start with a small more or less rectangular piece of green stuff in the middle of the front, use your sculpting tool (something with a flat side, if you don't have that, a toothpick will do, that's what I used at first, but don't use the tip) to gently press some of the (excess) greenstuff into the locations where you want it (e.g. around - but not in - the eyes). Try to roughly shape the facial armourplate like that. Then use your finger to gently roll a wet toothpick back and forth over the greenstuff, to give it a smooth and even texture. The wood will hold the water for a longer time, so that it doesn't stick to the greenstuff and the rolling motion will flatten the surface. You can then use a knife or appropriate sculpting tool (I just used the long end of a thin needle, as this is blunt and won't slice into the plastic underneath) to "cut" away the excessive greenstuff around the edges of the facial plate and giving it it's final shape. After doing this it is possible that you'll have to even the surface again. In a later article we'll cover adding texture and detail, but let's not overdo it just yet.
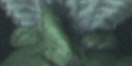
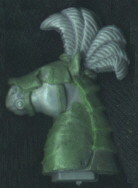
Because I found this particular head to be a bit slimmer than the regular plastic horseheads, I also added a thin additional layer to the cloth barding, but that's a simple task and I won't bore you with the details.
Et voila, your one-of-a-kind imperial horse is ready to be assembled. |
|||||||||||
Return
to the Back to the White Knight's Miniature Castle
|
||||||||||||
|
||||||||||||
|
||||||||||||
|
||||||||||||